新手必看,老鸟绕道–LAMP简易安装

Crq
Crq
管理员
1841
文章
0
粉丝
Linux教程评论4字数 2221阅读7分24秒阅读模式
摘要LAMP是企业中最常用的服务,也是非常稳定的网站架构平台。其中L-指的是Linux,A-指的是Apache,m-指的是mysql或者marriDB,p-php。相信大家对这些都已经...
准备工作

系统环境:centos 6.8 x86_64

[root@localhost ~]# uname -a
Linux localhost.localdomain 2.6.32-642.el6.x86_64 #1 SMP Tue May 10 17:27:01 UTC 2016 x86_64 x86_64 x86_64 GNU/Linux
[root@localhost ~]# cat /etc/redhat-release 
CentOS release 6.8 (Final)
[root@localhost ~]# 

LAMP相关包是否安装:
默认httpd已经安装,在这里我们说明下:本次实验我们采用的是yum的方式来进行安装,httpd就是Apache软件在RPM中的软件包名

[root@localhost ~]# rpm -qa httpd
httpd-2.2.15-53.el6.centos.x86_64
[root@localhost ~]# rpm -qa mysql*
[root@localhost ~]# rpm -qa php*
[root@localhost ~]# 
L-A-M-P 安装

LAMP的安装其实非常简单,一条命令搞定。个人认为对于初学着没有必要搞那么多这个插件,那个插件;到了深入了解了LAMP后在根据自己实际的需求来进行模块的安装,由易道难,循序渐进的学习。

yum仓库的检查
[root@localhost ~]# yum repolist                 \\查看yum仓库的情况
Loaded plugins: fastestmirror, refresh-packagekit, security
Loading mirror speeds from cached hostfile
 * base: mirrors.cn99.com
 * extras: mirrors.cn99.com
 * updates: mirrors.aliyun.com
base                                                               | 3.7 kB     00:00     
extras                                                             | 3.4 kB     00:00     
updates                                                            | 3.4 kB     00:00     
repo id                             repo name                                 status
base                                CentOS-6 - Base                           6,696
extras                              CentOS-6 - Extras                         62
updates                             CentOS-6 - Updates                        482
repolist: 7,240

我们使用的是centos默认的网络yum仓库,当然如果默认yum仓库比较慢的话,可以使用epel的软件包。

yum安装LAMP
[root@localhost ~]# yum -y install httpd mysql mysql-server mysql-devel php*
Loaded plugins: fastestmirror, refresh-packagekit, security
Setting up Install Process
Loading mirror speeds from cached hostfile
 * base: mirrors.cn99.com
 * extras: mirrors.cn99.com
 * updates: mirrors.aliyun.com
Resolving Dependencies
--> Running transaction check
---> Package httpd.x86_64 0:2.2.15-53.el6.centos will be updated
---> Package httpd.x86_64 0:2.2.15-54.el6.centos will be an update
--> Processing Dependency: httpd-tools = 2.2.15-54.el6.centos for package: httpd-2.2.15-54.el6.centos.x86_64
---> Package mysql.x86_64 0:5.1.73-7.el6 will be installed
..........................
Installed:
  mysql.x86_64 0:5.1.73-7.el6    mysql-devel.x86_64 0:5.1.73-7.el6    mysql-server.x86_64 0:5.1.73-7.el6     
  php.x86_64 0:5.3.3-48.el6_8    php-bcmath.x86_64 0:5.3.3-48.el6_8   php-cli.x86_64 0:5.3.3-48.el6_8        
 .........
Updated:
  httpd.x86_64 0:2.2.15-54.el6.centos                                                                                   
Dependency Updated:
  httpd-tools.x86_64 0:2.2.15-54.el6.centos  net-snmp-libs.x86_64 1:5.5-57.el6_8.1  openssl.x86_64 0:1.0.1e-48.el6_8.1 
Complete!

我们yum命令安装httpd ,安装mysql mysql-server 和mysql-devel开发包,在php的安装包上面我们选择了php* 的命令匹配搜有php相关的包。注意,注意的操作是为了让入门童鞋们先了解LAMP的方案,在深入了解后,还是要跟进实际的情况安装搜需要的包。

LAMP初始化

安装完成LAMP后,我们需要对LAMP进行初始化,其实也就是启动服务,开机自起和必要的配置。

Apache的初始化
[root@localhost ~]# service httpd start           \\启动httpd服务;注意httpd和apache的关系
Starting httpd: httpd: Could not reliably determine the server's fully qualified domain name, using localhost.localdomain for ServerName
                                                           [  OK  ]
[root@localhost ~]# chkconfig httpd on             \\设置httpd开启自器
mysql的初始化
[root@localhost ~]# service mysqld start           \\开启mysql服务,会提示需要初始化,很详细
Initializing MySQL database:  Installing MySQL system tables...
OK
Filling help tables...
OK
To start mysqld at boot time you have to copy
support-files/mysql.server to the right place for your system
PLEASE REMEMBER TO SET A PASSWORD FOR THE MySQL root USER !
To do so, start the server, then issue the following commands:
/usr/bin/mysqladmin -u root password 'new-password'
/usr/bin/mysqladmin -u root -h localhost.localdomain password 'new-password'
Alternatively you can run:
/usr/bin/mysql_secure_installation
which will also give you the option of removing the test
databases and anonymous user created by default.  This is
strongly recommended for production servers.
See the manual for more instructions.
You can start the MySQL daemon with:
cd /usr ; /usr/bin/mysqld_safe &
You can test the MySQL daemon with mysql-test-run.pl
cd /usr/mysql-test ; perl mysql-test-run.pl
Please report any problems with the /usr/bin/mysqlbug script!
                                                           [  OK  ]
Starting mysqld:                                           [  OK  ]
[root@localhost ~]# chkconfig mysqld on                \\设置mysql开机自启动
[root@localhost ~]# mysqladmin -u root password linuxprobe.com
                            \\初始化mysql,在这里需要设置mysql的root的密码;命令:mysqladmin -u 用户 password 密码
[root@localhost ~]# mysql -u root -p                    \\登录mysql查看是否能够登录        
Enter password: 
Welcome to the MySQL monitor.  Commands end with ; or \g.
Your MySQL connection id is 3
Server version: 5.1.73 Source distribution
Copyright (c) 2000, 2013, Oracle and/or its affiliates. All rights reserved.
Oracle is a registered trademark of Oracle Corporation and/or its
affiliates. Other names may be trademarks of their respective
owners.
Type 'help;' or '\h' for help. Type '\c' to clear the current input statement.
mysql>                                             \\ok登录成功

注意:在yum安装lamp的时候,其实php只是apache的一个集成的组件,不需要添加模块的应用,只要在配置文件中启用就可以了。

环境简单的测试
查看经常mysql和httpd是否运行:
[root@localhost ~]# ps -aux |grep httpd               \\查看httpd的进程
Warning: bad syntax, perhaps a bogus '-'? See /usr/share/doc/procps-3.2.8/FAQ
root      2930  0.0  2.9 487660 14664 ?        Ss   10:46   0:00 /usr/sbin/httpd
apache    2933  0.0  1.9 487660  9400 ?        S    10:46   0:00 /usr/sbin/httpd
apache    2934  0.0  1.8 487660  9112 ?        S    10:46   0:00 /usr/sbin/httpd
apache    2935  0.0  1.9 487660  9400 ?        S    10:46   0:00 /usr/sbin/httpd
apache    2936  0.0  1.9 487660  9392 ?        S    10:46   0:00 /usr/sbin/httpd
apache    2937  0.0  1.8 487660  9116 ?        S    10:46   0:00 /usr/sbin/httpd
apache    2938  0.0  1.8 487660  9136 ?        S    10:46   0:00 /usr/sbin/httpd
apache    2939  0.0  1.8 487660  9112 ?        S    10:46   0:00 /usr/sbin/httpd
apache    2940  0.0  2.3 487844 11840 ?        S    10:46   0:00 /usr/sbin/httpd
root     10163  0.0  0.1 103316   868 pts/3    S+   12:23   0:00 grep httpd
[root@localhost ~]# ps -aux |grep mysql               \\查看mysql的相关进程
Warning: bad syntax, perhaps a bogus '-'? See /usr/share/doc/procps-3.2.8/FAQ
root      3035  0.0  0.2 108216  1452 pts/1    S    10:47   0:00 /bin/sh /usr/bin/mysqld_safe --datadir=/var/lib/mysql --socket=/var/lib/mysql/mysql.sock --pid-file=/var/run/mysqld/mysqld.pid --basedir=/usr --user=mysql
mysql     3137  0.0  4.3 367512 21444 pts/1    Sl   10:47   0:02 /usr/libexec/mysqld --basedir=/usr --datadir=/var/lib/mysql --user=mysql --log-error=/var/log/mysqld.log --pid-file=/var/run/mysqld/mysqld.pid --socket=/var/lib/mysql/mysql.sock
root     10165  0.0  0.1 103316   868 pts/3    S+   12:23   0:00 grep mysql
[root@localhost ~]# netstat -tanulp |grep 80      \\查看httpd 的端口对外监听
tcp        0      0 192.168.1.108:50878         63.80.4.177:80              ESTABLISHED 2629/clock-applet   
tcp        0      0 :::80                       :::*                        LISTEN      2930/httpd          
[root@localhost ~]# netstat -tanulp |grep 3306     \\查看mysql的端口对外监听
tcp        0      0 0.0.0.0:3306                0.0.0.0:*                   LISTEN      3137/mysqld    
防火墙的相关设置
[root@localhost ~]# iptables -L                   \\查看iptables的规则
Chain INPUT (policy ACCEPT)
target     prot opt source               destination         
ACCEPT     all  --  anywhere             anywhere            state RELATED,ESTABLISHED 
ACCEPT     icmp --  anywhere             anywhere            
ACCEPT     all  --  anywhere             anywhere            
ACCEPT     tcp  --  anywhere             anywhere            state NEW tcp dpt:ssh 
REJECT     all  --  anywhere             anywhere            reject-with icmp-host-prohibited 
Chain FORWARD (policy ACCEPT)
target     prot opt source               destination         
REJECT     all  --  anywhere             anywhere            reject-with icmp-host-prohibited 
Chain OUTPUT (policy ACCEPT)
target     prot opt source               destination     
[root@localhost ~]# iptables -I INPUT 1 -p tcp --dport 80 -j ACCEPT     
                                     \\添加iptables INPUT的链的第一条规则允许tcp协议的80端口
                                  \\关于iptables 的更多设置,请参考《linux就该这样学》相关内容
[root@localhost ~]# service iptables save        \\将我们的添加的规则保存在配置文件
iptables: Saving firewall rules to /etc/sysconfig/iptables:[  OK  ]
[root@localhost ~]# iptables -L                         \\查看保存情况
Chain INPUT (policy ACCEPT)
target     prot opt source               destination         
ACCEPT     tcp  --  anywhere             anywhere            tcp dpt:http 
ACCEPT     all  --  anywhere             anywhere            state RELATED,ESTABLISHED 
ACCEPT     icmp --  anywhere             anywhere            
ACCEPT     all  --  anywhere             anywhere            
ACCEPT     tcp  --  anywhere             anywhere            state NEW tcp dpt:ssh 
REJECT     all  --  anywhere             anywhere            reject-with icmp-host-prohibited 
Chain FORWARD (policy ACCEPT)
target     prot opt source               destination         
REJECT     all  --  anywhere             anywhere            reject-with icmp-host-prohibited 
Chain OUTPUT (policy ACCEPT)
target     prot opt source               destination         
测试httpd的静态文件

添加一个测试的静态index.html页面,或者使用默认的页面进行测试。关于添加网站页面的更多问题,请参考《linux就该这样学》的相关内容

[root@localhost ~]# echo "hello word" > /var/www/html/index.html

测试用ie浏览器测试静态页面:

新手必看,老鸟绕道–LAMP简易安装-图片1

ok,测试成功。

配置文件
[root@localhost ~]# ls /etc/httpd/              \\配置文件目录,相关配置模块
conf/    conf.d/  logs/    modules/ run/     
[root@localhost ~]# vi /etc/httpd/conf/
httpd.conf  magic       
[root@localhost ~]# vi /etc/httpd/conf/httpd.conf     \\主配文件
[root@localhost ~]# wc -l /etc/httpd/conf/httpd.conf    
1009 /etc/httpd/conf/httpd.conf
                              \\ 主配文件共有1009行,其中有好多都是注释的.养成好习惯,备份默认配置文件
[root@localhost ~]# tail /etc/httpd/conf/httpd.conf      \\更多配置建议参考《linux就该这样学》相关内容
# The first VirtualHost section is used for requests without a known
# server name.
#
#                                          \\配置文件中添加虚拟主机的语句
#    ServerAdmin webmaster@dummy-host.example.com
#    DocumentRoot /www/docs/dummy-host.example.com
#    ServerName dummy-host.example.com
#    ErrorLog logs/dummy-host.example.com-error_log
#    CustomLog logs/dummy-host.example.com-access_log common
#
高级环境的测试

LAMP是一个稳定的动态的网站架构方案,在这里我们需要添加php的支持,测试动态网站。

启用对php的支持
[root@localhost ~]# vi /etc/httpd/conf/httpd.conf

	
新手必看,老鸟绕道–LAMP简易安装-图片2
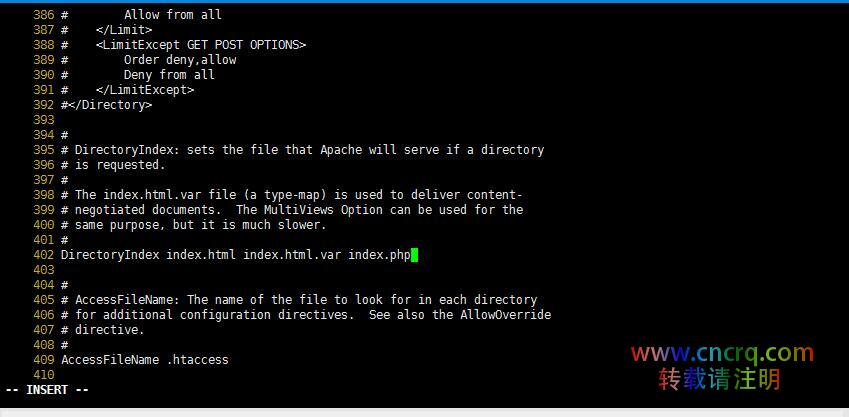
[root@localhost ~]# cat /etc/httpd/conf/httpd.conf |grep DirectoryIndex \\在配置文件402行添加对php页面的支持 # DirectoryIndex: sets the file that Apache will serve if a directory
添加php测试页面,测试
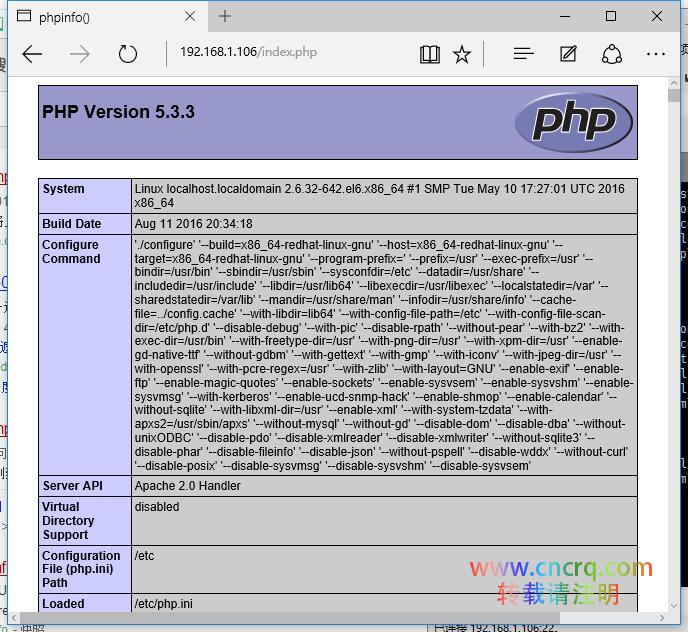
[root@localhost ~]# vi /var/www/html/index.php
[root@localhost ~]# cat /var/www/html/index.php    \\添加php信息的测试页面

[root@localhost ~]# vi /var/www/html/test.php
[root@localhost ~]# cat /var/www/html/test.php      \\添加php页面测试
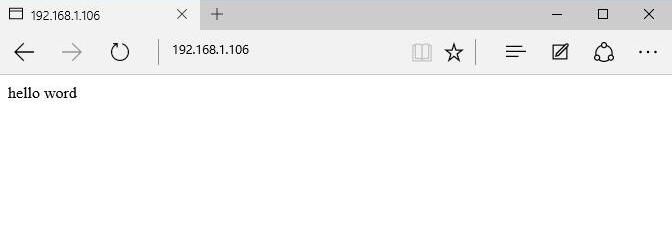
test 
this php test

测试:

新手必看,老鸟绕道–LAMP简易安装-图片2

新手必看,老鸟绕道–LAMP简易安装-图片3

注意:
动态网页搭建动族论坛 过程略,大家自己测试
Apache:httpd(服务名) 80 (端口)
Mysql: mysqld(服务名) 3306(端口,默认只对本地监听)
php:在apache 中集成,只需添加启用php默认文档即可
lamp的日志等功能,建议查看相关文档
建议安装lamp为了让入门童鞋更加容易了解lamp,生产环境要根据实际情况安装不通的组件。

LAMP,so easy!!!

本文原创地址:https://www.linuxprobe.com/yum-lamp-easy.html作者:陶武杰,审核员:冯琪

本文原创地址:https://www.linuxprobe.com/yum-lamp-easy.html编辑:public,审核员:暂无

weinxin
我的微信
微信号已复制
我的微信
这是我的微信扫一扫
 
Crq
  • 本文由 Crq 发表于2025年3月10日 03:35:31
  • 转载请注明:https://www.cncrq.com/13382.html
简单易懂的crontab设置工具集 Linux教程

简单易懂的crontab设置工具集

在上一篇文章中,我介绍了crontab的配置文件以及如何设置定时任务,对于偶尔用一次crontab的同学而言,可能遗忘配置语法会很快,这里我向大家推荐几个在线设置crontab任务...
crontab用法与实例 Linux教程

crontab用法与实例

在Linux系统的实际使用中,可能会经常碰到让系统在某个特定时间执行某些任务的情况,比如定时采集服务器的状态信息、负载状况;定时执行某些任务/脚本来对远端进行数据采集等。这里将介绍...
匿名

发表评论

匿名网友
:?: :razz: :sad: :evil: :!: :smile: :oops: :grin: :eek: :shock: :???: :cool: :lol: :mad: :twisted: :roll: :wink: :idea: :arrow: :neutral: :cry: :mrgreen:
确定

拖动滑块以完成验证